Travis-ci+Hexo+GithubPages搭建个人博客
1.本地搭建博客框架
安装node.js,最好是10这个版本的
windows10下
链接:https://pan.baidu.com/s/1gS0UEbEeicHlMaXUe-pgYw 提取码:4n2cUbuntu下:
# 更新软件
sudo apt remove --purge nodejs npm
sudo apt clean
sudo apt autoclean
sudo apt install -f
sudo apt autoremove
# 安装
sudo apt install curl
curl -sL https://deb.nodesource.com/setup_10.x | sudo -E bash -
sudo apt-get install -y nodejs
curl -sL https://dl.yarnpkg.com/debian/pubkey.gpg | sudo apt-key add -
sudo apt-get update && sudo apt-get install yarn
npm换源
# npm换源
npm config set registry https://registry.npm.taobao.org
#如果只是临时改变源,可以这样
npm --registry=https://registry.npm.taobao.org
# 更新
npm install -g npm
创建博客
# 全局安装hexo
npm install hexo-cli -g
# 创建项目
hexo init Github用户名.github.io
# 安装依赖
npm install
# 安装主题(去Hexo官网选择自己喜欢的博客主题)
npm install --save hexo-theme-fluid
# 启动项目
npm run server
# 访问http://localhost:4000查看效果
2.Github配置
创建一个
用户名.github.io的public类型的仓库,不要新建Readme.md文件创建Github访问令牌:教程
创建一个
resource分支,将其设置为主分支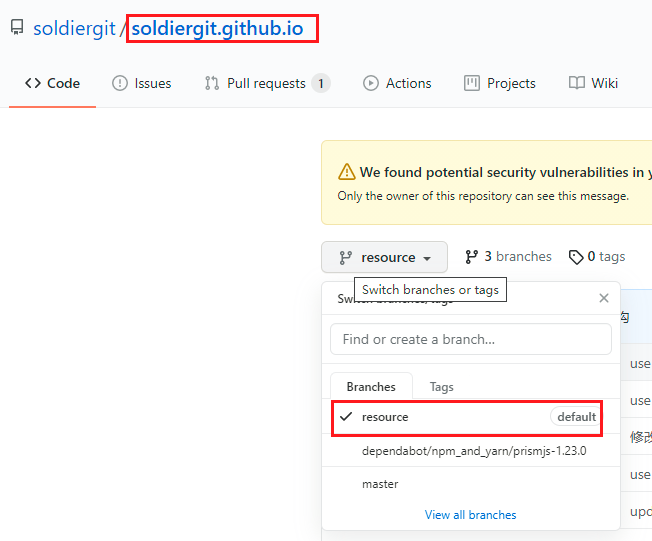
手动部署项目先提交一次到Github
# 在项目根目录初始化
git init
# 设置远程仓库
git remote add origin https://github.com/soldiergit/soldiergit.github.io.git
# 添加
git add .
# 提交信息
git commit -m 'init commit'
# 提交项目(注意这个分支是源码分支,不是GithubPages页面分支-是master)
git push origin resource
配置
_config.ymldeploy: - type: git # 部署到的仓库 repo: https://github.com/soldiergit/soldiergit.github.io # 部署到的分支(GithubPages页面分) branch: master部署
# 项目根目录输入
hexo deploy
# 输入GitHub用户名密码即可完成部署
3.Travis-ci配置
- 使用github账号授权登录 Travis-ci官网 ,点击Sign In
- 在官网build
用户名.github.io项目
点击这里的“+”号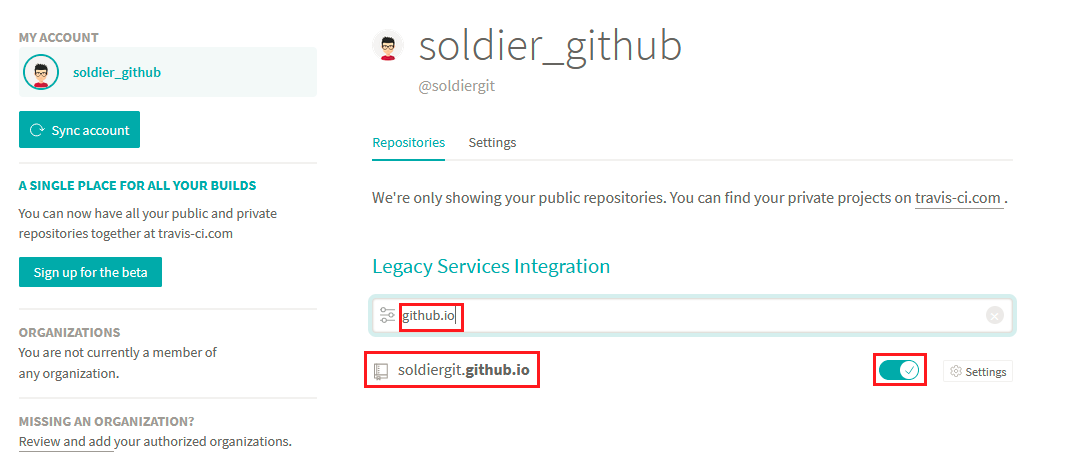
找到或搜索我们的项目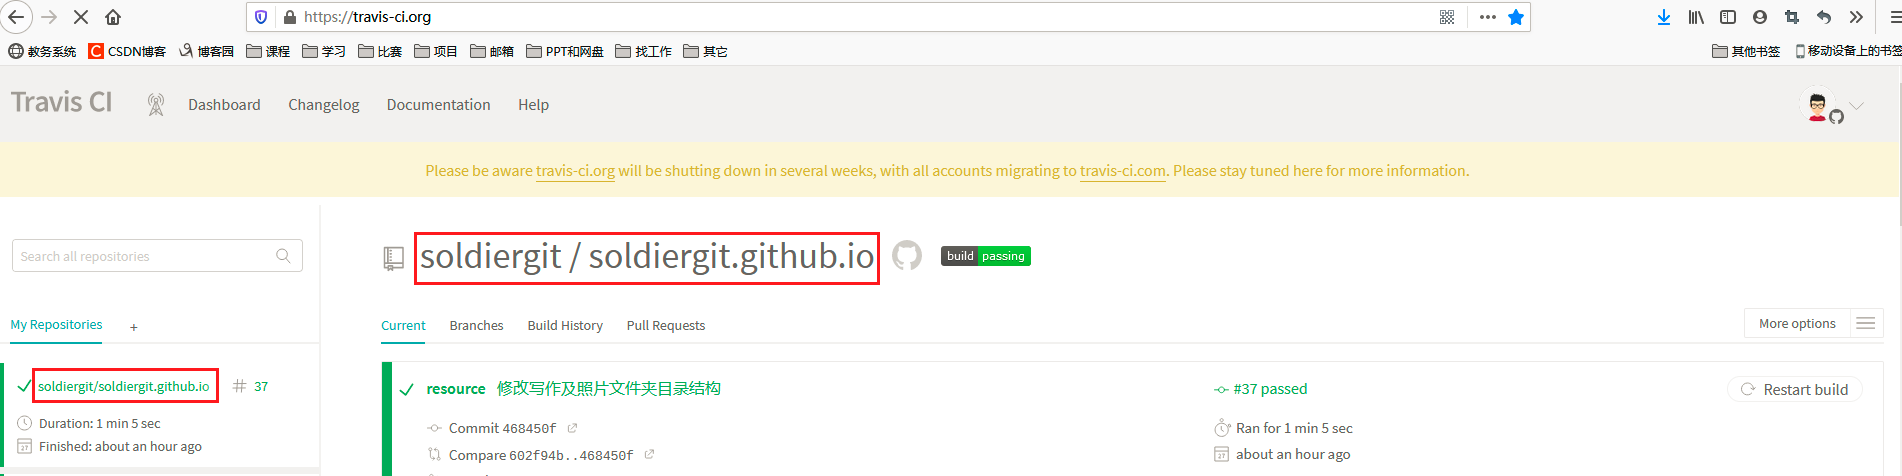
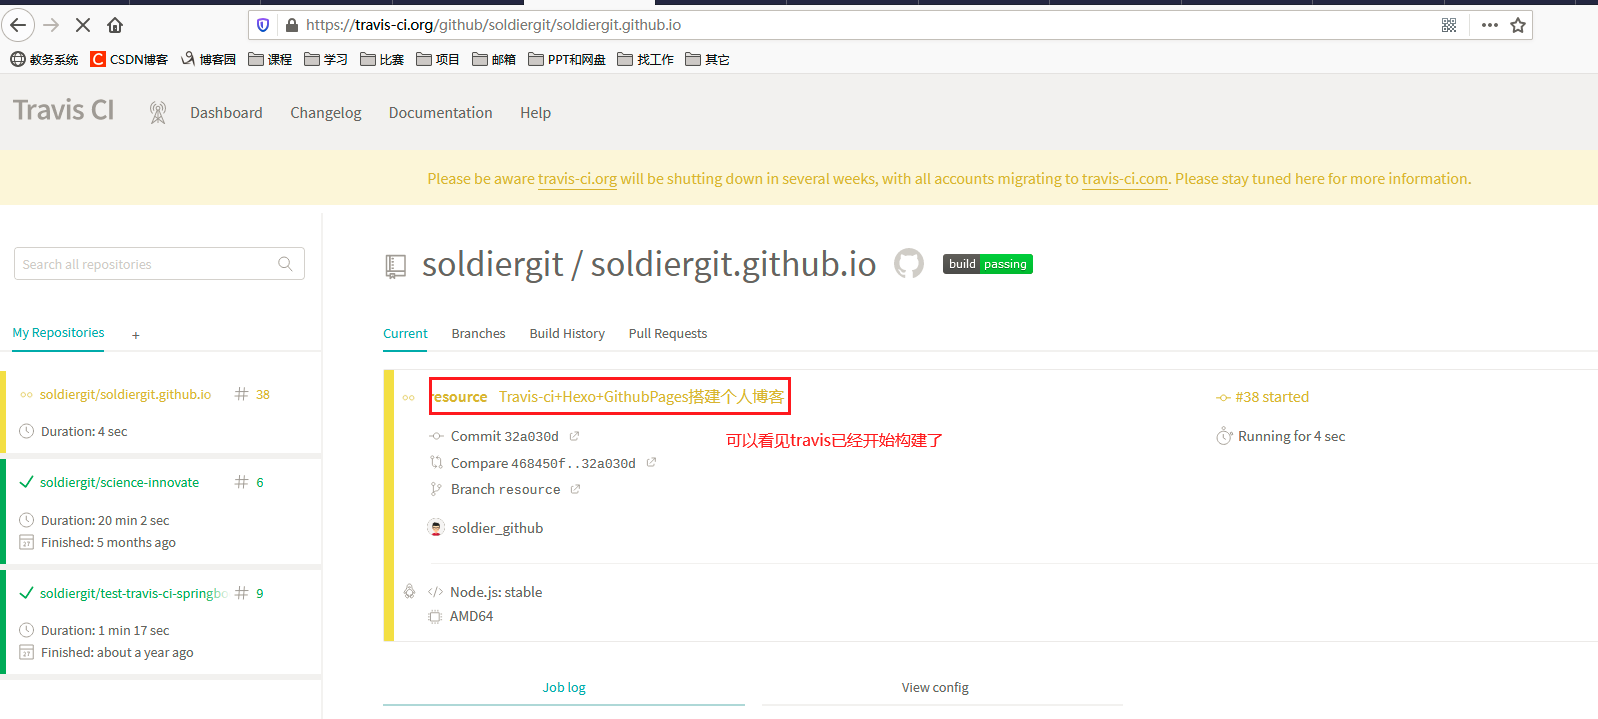
完成之后可以在首页见到该项目
- 进入该项目,点击右侧的
More options选择Settings
在Environment Variables下 add 一个名为Github_Token的变量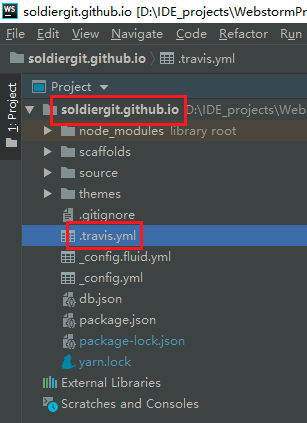
4.提交代码到Github
在本地项目的根目录下新建一个
.travis.yml文件点击展开
# 设置语言
language: node_js

# 设置相应的版本
node_js: stable

cache:
  apt: true
  directories:
    - node_modules # 缓存不经常更改的内容

# 更改时区
before_install:
  - export TZ='Asia/Shanghai'

# 安装hexo及插件
install:
  - npm install

# 下拉代码后执行的操作
script:
  - hexo clean # 清除
  - hexo g # 生成

after_script:
  - cd ./public
  - git init
  # 修改github的用户名
  - git config user.name "soldiergit"
  # 修改email
  - git config user.email "soldier_wyyx@163.com"
  - git add .
  # 提交记录包含时间 跟上面更改时区配合
  - git commit -m "Travis CI Auto Builder at `date +"%Y-%m-%d %H:%M"`"
  # Travis_Token是在Travis官网中配置环境变量的名称(more options 选择 setting添加的值)
  - git push --force --quiet "https://${Github_Token}@${GH_REF}" master:master

# 只监测resource分支,resource是我存放源码的分支的名称,可根据自己情况设置
branches:
  only:
    - resource

# 配置常量
env:
  global:
    # 设置GH_REF,注意更改yourname及末尾加上.git
    - GH_REF: github.com/soldiergit/soldiergit.github.io.git

# 配置通知(电子邮件、IRC、campfire等)
# https://docs.travis-ci.com/user/notifications/
notifications:
  email:
    - 583403411@qq.com
    - soldier_wyyx@163.com
  on_success: change
  on_failure: always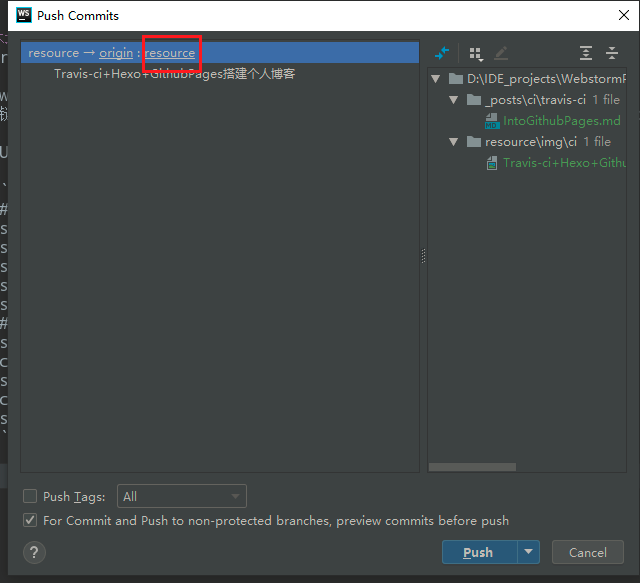
将所有代码提交到Github的
resource上即可

4.实现在线写作
实现思路
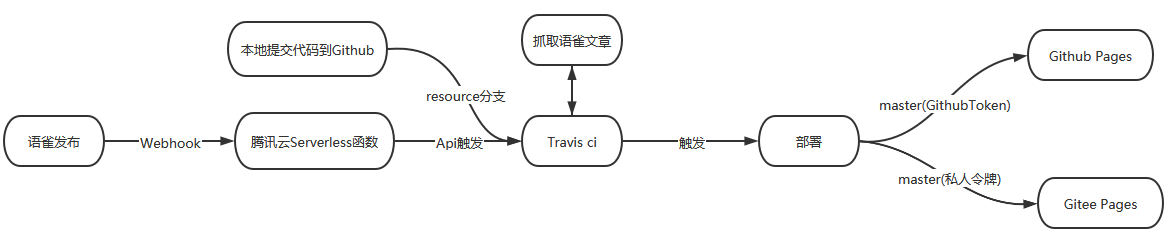
实现步骤
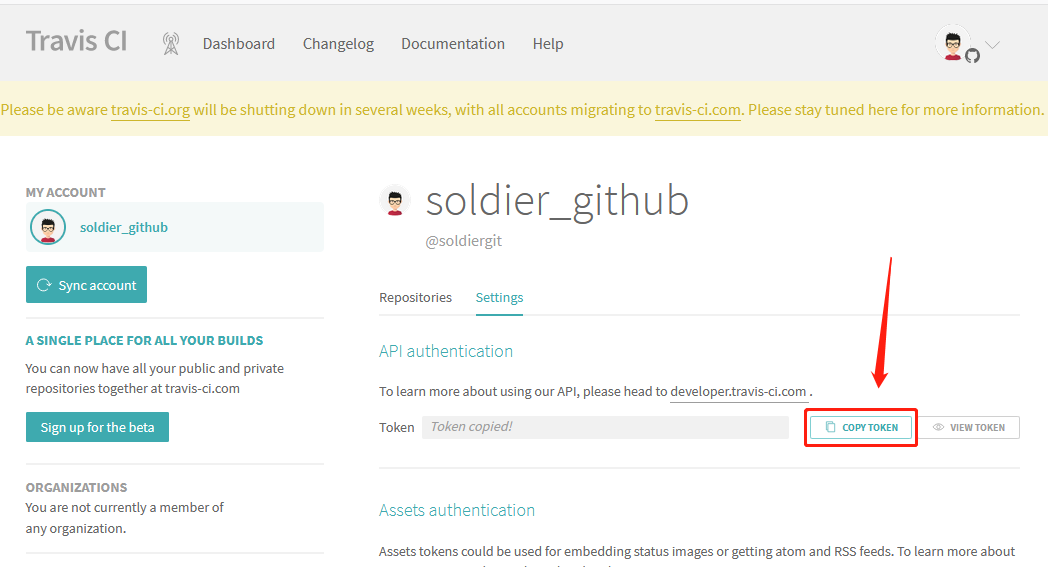
获取 Travis-ci 的访问 token
编写触发 Travis-ci 的 Serverless 函数:注册腾讯云 并边创建一个云函数
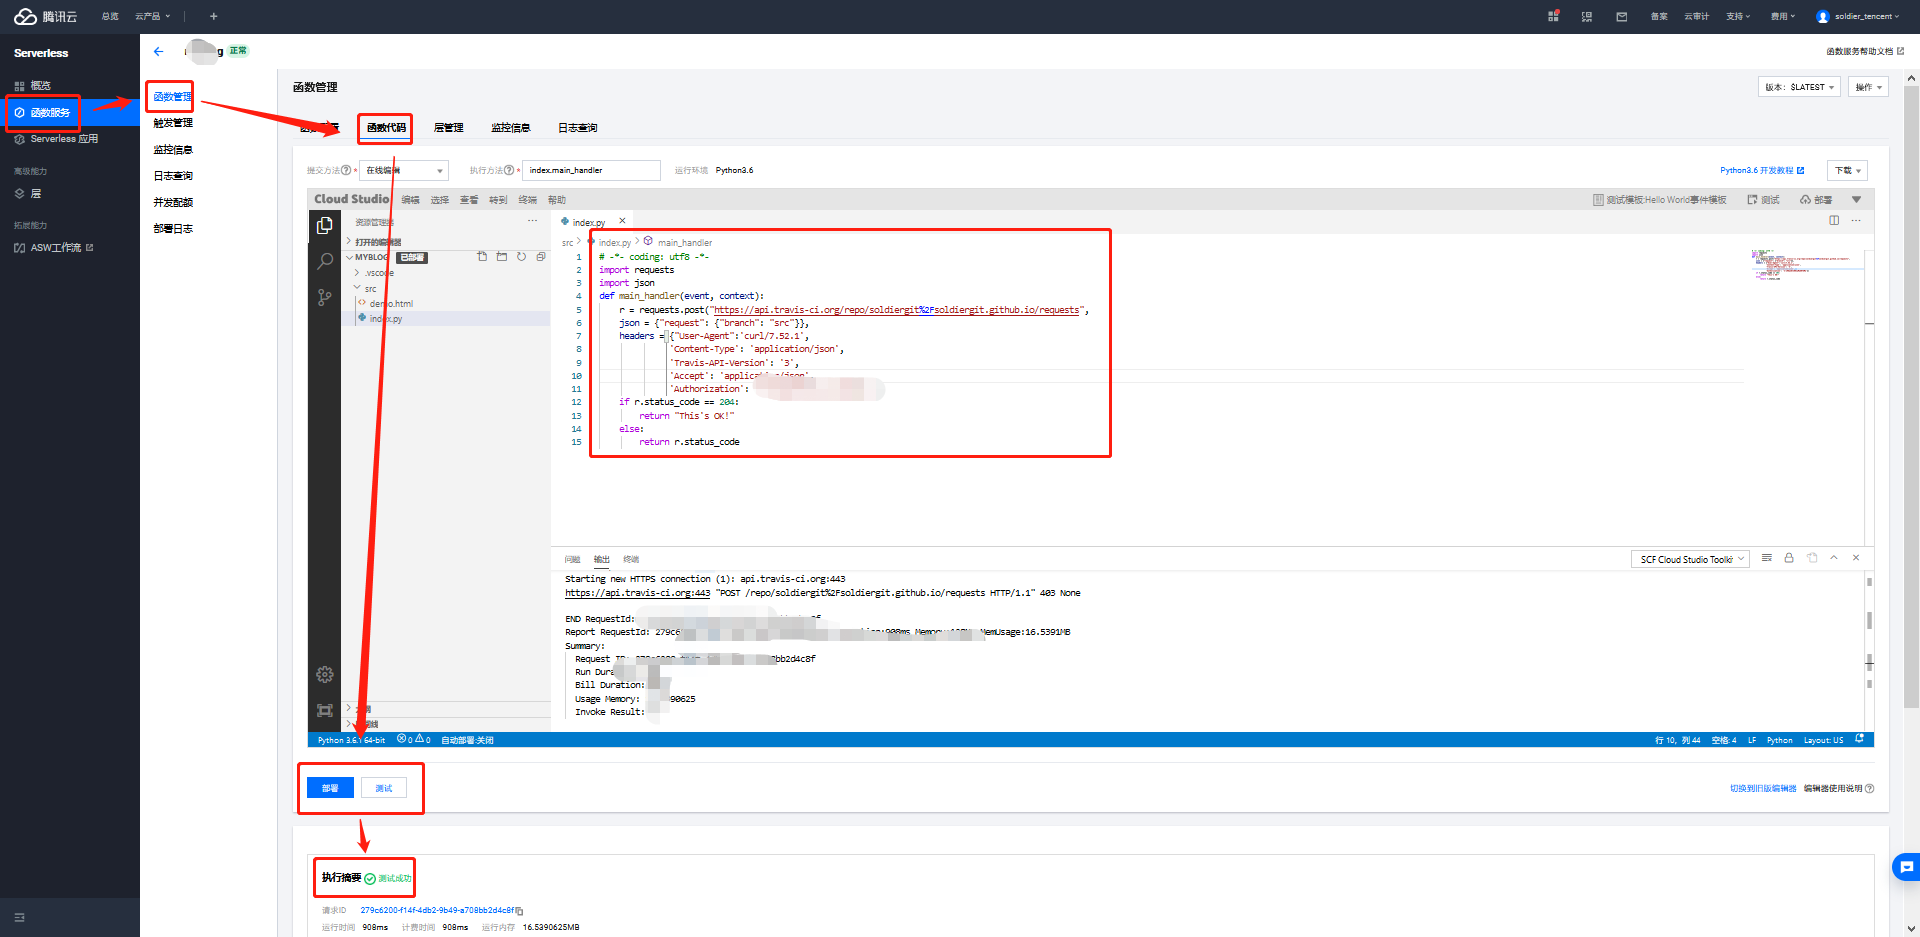
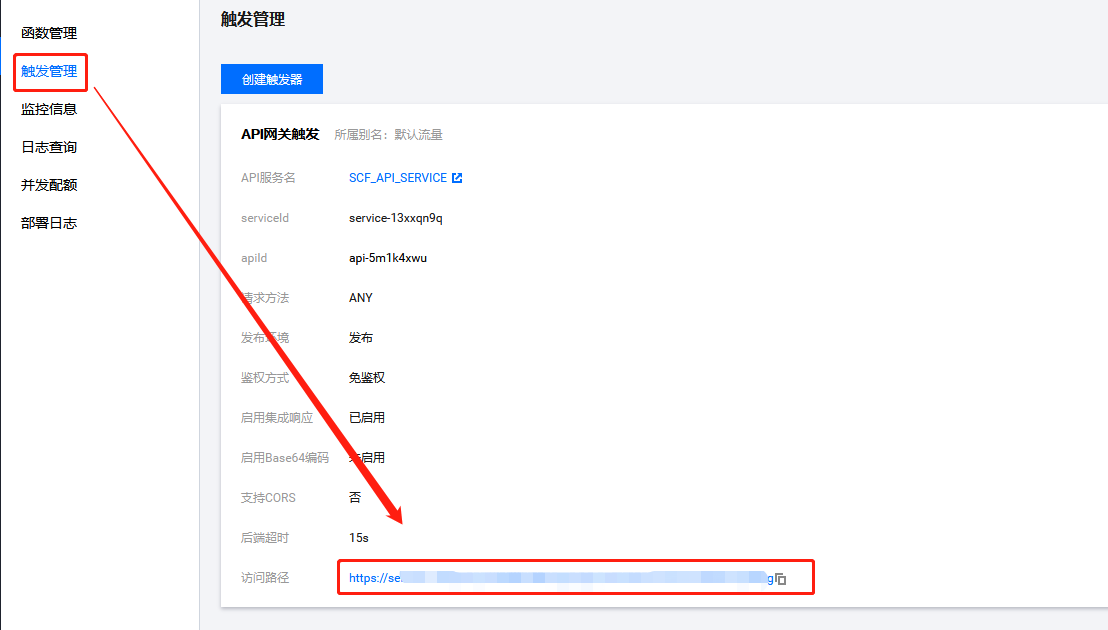
# -*- coding: utf8 -*-
import requests
import json
def main_handler(event, context):
    r = requests.post("https://api.travis-ci.org/repo/soldiergit%2Fsoldiergit.github.io/requests",
    json = {"request": {"branch": "src"}},
    headers = {"User-Agent":'curl/7.52.1',
              'Content-Type': 'application/json',
              'Travis-API-Version': '3',
              'Accept': 'application/json',
              'Authorization': 'travis-ci的token'})
    if r.status_code == 204:
        return "This's OK!"
    else:
        return r.status_code
创建触发器,将函数发布,复制该函数的访问地址
配置语雀
- 注册语雀账号,创建一个
文档知识库,专门为GithubPages服务 - 配置语雀 webhook,将上一步复制的函数访问地址贴到 URL 那栏

- 创建一个语雀Token,勾选
读取
- 注册语雀账号,创建一个
项目配置
安装插件
npm i -g yuque-hexo配置 package.json
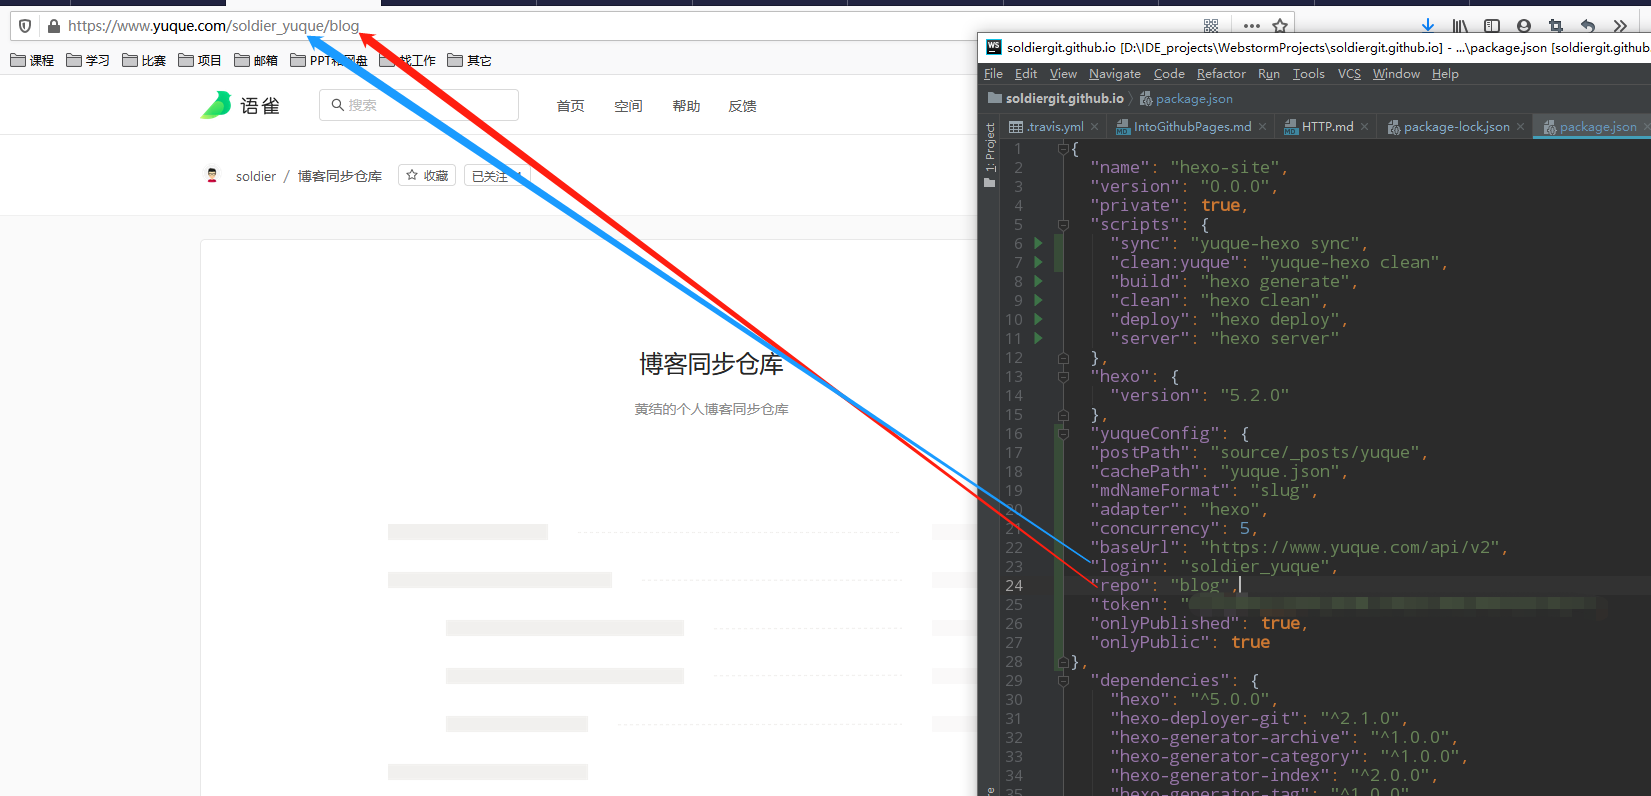
{
  "name": "hexo-site",
  "version": "0.0.0",
  "private": true,
  "scripts": {
    "sync": "yuque-hexo sync",
    "clean:yuque": "yuque-hexo clean",
    "build": "hexo generate",
    "clean": "hexo clean",
    "deploy": "hexo deploy",
    "server": "hexo server"
  },
  "hexo": {
    "version": "5.2.0"
  },
  "yuqueConfig": {
  "postPath": "source/_posts/yuque",
  "cachePath": "yuque.json",
  "mdNameFormat": "slug",
  "adapter": "hexo",
  "concurrency": 5,
  "baseUrl": "https://www.yuque.com/api/v2",
  "login": "soldier_yuque",
  "repo": "blog",
  "token": "语雀的token",
  "onlyPublished": true,
  "onlyPublic": true
},
  "dependencies": {
    "hexo": "^5.0.0",
    "hexo-deployer-git": "^2.1.0",
    "hexo-generator-archive": "^1.0.0",
    "hexo-generator-category": "^1.0.0",
    "hexo-generator-index": "^2.0.0",
    "hexo-generator-tag": "^1.0.0",
    "hexo-renderer-ejs": "^1.0.0",
    "hexo-renderer-marked": "^3.0.0",
    "hexo-renderer-stylus": "^2.0.0",
    "hexo-server": "^2.0.0",
    "hexo-theme-fluid": "^1.8.4",
    "yuque-hexo": "^1.7.0"
  }
}
配置
.travis.yml点击展开
# 设置语言
language: node_js

# 设置相应的版本(必须12以上)
node_js:
  - 15

cache:
  apt: true
  directories:
    - node_modules # 缓存不经常更改的内容

# 更改时区
before_install:
  - export TZ='Asia/Shanghai'

# 安装hexo及插件
install:
  - npm install hexo-cli
  - npm install yuque-hexo
  - npm install

# 下拉代码后执行的操作
script:
  # 同步语雀文章到本地
  - yuque-hexo clean
  - yuque-hexo sync
  - hexo generate # 生成

after_script:
  - cd ./public
  - git init
  # 修改github的用户名
  - git config user.name "soldiergit"
  # 修改email
  - git config user.email "soldier_wyyx@163.com"
  - git add .
  # 提交记录包含时间 跟上面更改时区配合
  - git commit -m "Travis CI Auto Builder at `date +"%Y-%m-%d %H:%M"`"
  # Travis_Token是在Travis官网中配置环境变量的名称(more options 选择 setting添加的值)
  - git push --force --quiet "https://${Github_Token}@${GH_REF}" master:master
  # 【2021.05.13】修改gitee的用户名
  - git config user.name "${Gitee_Username}"
  # 【2021.05.13】也提交到码云
  - git push --force --quiet https://${Gitee_Username}:${Gitee_Token}@${GE_REF} master:master

# 只监测resource分支,resource是我存放源码的分支的名称,可根据自己情况设置
branches:
  only:
    - resource

# 配置常量
env:
  global:
    # 设置GH_REF,注意更改yourname及末尾加上.git
    - GH_REF: github.com/soldiergit/soldiergit.github.io.git
    # 【2021.05.13】码云的
    - GE_REF: gitee.com/soldiergitee/soldiergitee.git

# 配置通知(电子邮件、IRC、campfire等)
# https://docs.travis-ci.com/user/notifications/
notifications:
  email:
    - 583403411@qq.com
    - soldier_wyyx@163.com
  on_success: change
  on_failure: always
配置完成将其提交到你的 github 仓库。
注意:语雀不要开启保存并发布,否则无法触发 webhook
本博客所有文章除特别声明外,均采用 CC BY-SA 4.0 协议 ,转载请注明出处!